Some people consider the shoulder to be the body’s most obscure joint.
It could feel like your shoulders are never comfortable no matter what you do. They vary from “good” to “bad.”
Although it’s a complex joint, having broad shoulders is undoubtedly one of the main characteristics of an amazing body.
So, training them is still necessary.
I’m going to offer you a thorough explanation of Lateral Raises in this article because it’s the most effective shoulder exercise that we currently know. We’ll go over the anatomy of the shoulder, proper technique for performing the lateral rise, common mistakes to avoid, and several ways to adjust it.
I’ll be sure to leave you with the shoulder-training routines that I think are the greatest. Additionally, as a bonus, we’ll discuss how to properly force a few repetitions at the conclusion of a set.
Anatomy Primer
A brief overview of the shoulder joint, shoulder movement, and shoulder muscles will help you understand how best to perform lateral raises.
The Shoulder Joint
The shoulder is comprised of three bones:
- Clavicle or collarbone
- Scapula or shoulder blade
- Humerus or arm bone

The shoulder is likened to a golf ball on a tee: the humerus (ball) sits inside the glenoid of the scapula (the tee).
Lateral Raises Require Both Shoulder and Scapular Movement
Normal shoulder function requires this ball-on-tee spinning, but also requires rotation of the shoulder blade.
As the hand lifts up, the scapula upwardly rotates. This requires activation of the trapezius and serratus anterior muscles.


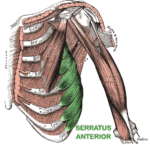
Approximately one-third of shoulder abduction or flexion is attributed to this scapular movement. Without this, shoulder impingement and injury are likely to occur.
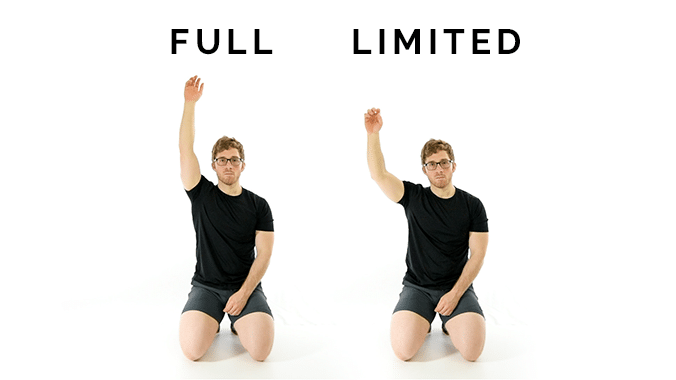
Lateral Raises Can Contribute to Rotator Cuff Injuries and Shoulder Impingement
The rotator cuff is comprised of four muscles:
- Supraspinatus
- Infraspinatus
- Teres minor
- Subscapularis
The two most superiorly positioned muscles, the supraspinatus and infraspinatus, are the most likely to be injured.
When the arm bone rises up, the rotator cuff is pushed into the acromion process of the scapula. We classify this bony projection based on it’s shape:
- Type I – flat, safe
- Type II – mild curve, most common
- Type III – sharp hook, most problematic
- Type IV – convex, safe
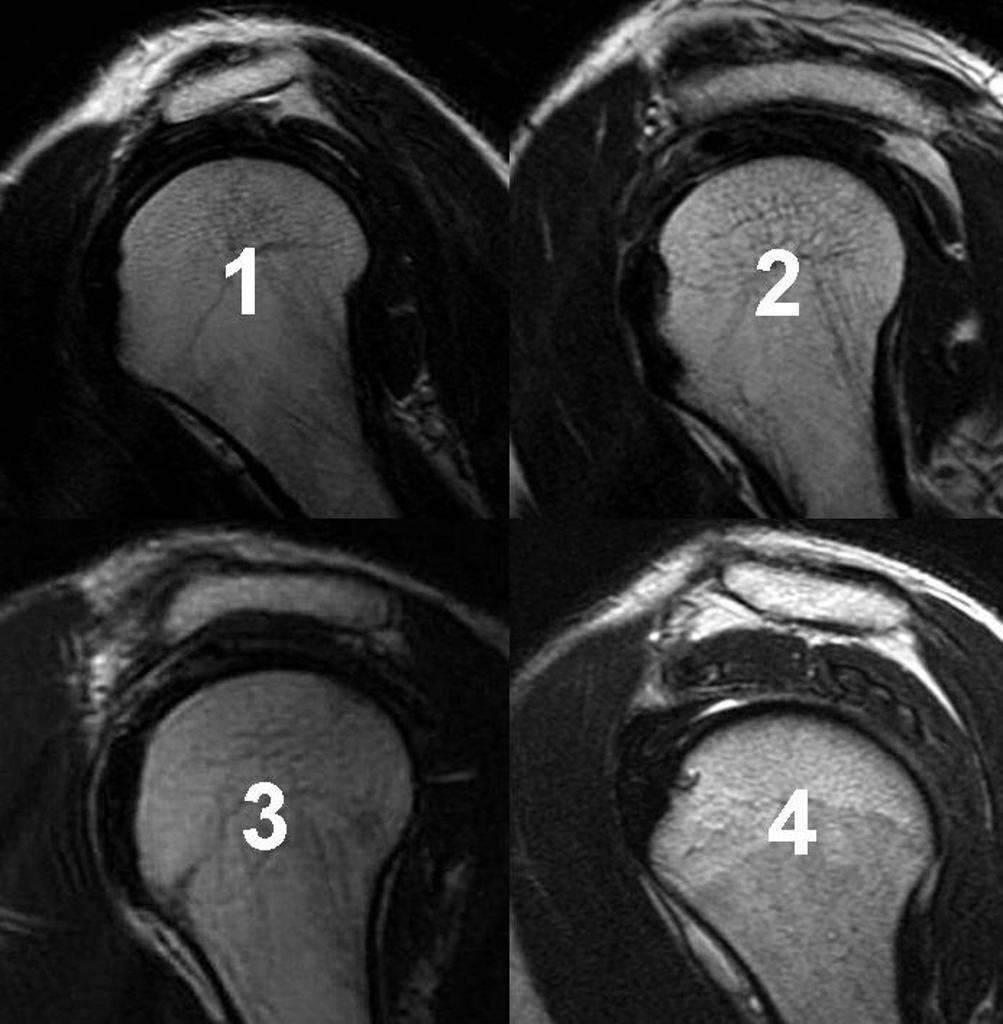
This shoulder impingement results in friction that can tear these rotator cuff muscles, especially with a type III acromion.
Lateral Raises are Great for Deltoid Isolation
Contrary to their name, lateral raises do not work the lats.
The deltoid muscle gives mass to the shoulder. It is comprised of three sections:
- Anterior or front
- Middle or lateral
- Posterior or rear

The anterior deltoid brings the arm up and forward (flexion, horizontal adduction, and internal rotation). It assists the chest during a bench press and looks a lot like the upper pectoralis major (the clavicular portion).
The middle deltoid brings the arm purely up and out to the sides (abduction). It’s our main target during lateral raises.
The rear deltoid brings the arm up and backward (extension, horizontal abduction, and external rotation).
Lateral Raises Can Stiffen the Neck
The force vector of the weights in a lateral raise can confuse the body.
It’s obvious to the lifter that we are targeting the deltoids, but the upper trapezius muscle is highly involved for two reasons:
- The upper trap helps upwardly rotate the shoulder blade (kind of)
- The upper trap helps elevate the shoulder blade
Both of these can create momentum that helps perform the lateral raise, but at a cost.
Excess upper trap activity during the lateral raise stiffens the neck. It’s best to keep tension on the deltoid instead.
How to Perform Lateral Raises
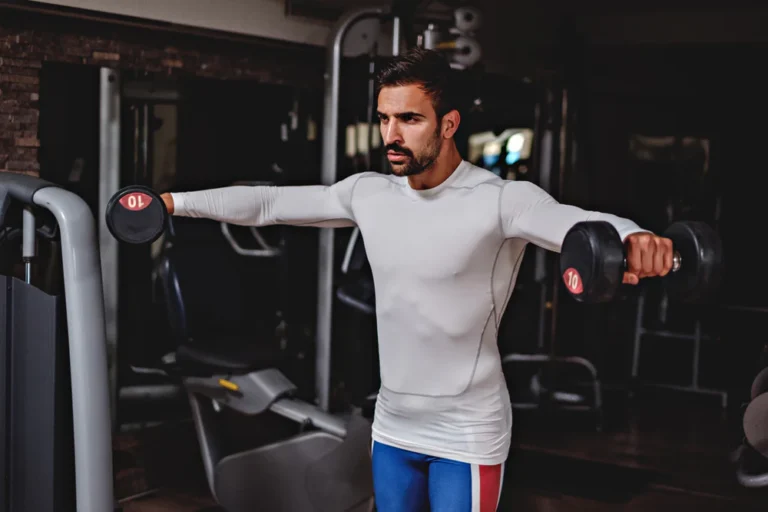
- Stand tall holding two dumbbells
- Keeping the arms straight, slowly lift both weights out and up to shoulder level
- Pause briefly
- Lower slowly under control
Variations of Lateral Raises
Lateral raises can be modified in any of the following ways:
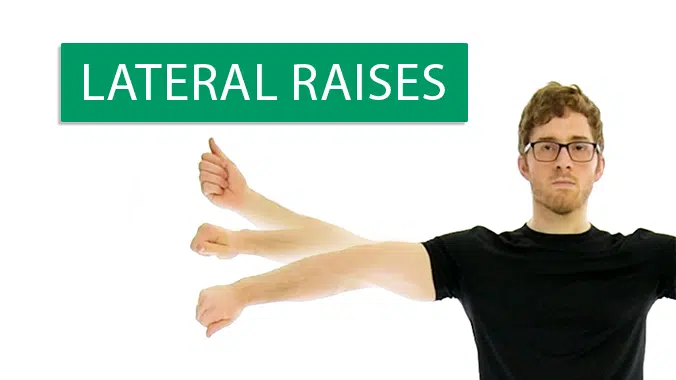
- Hand orientation (i.e., thumb up, palm down, thumb down)
- Plane of movement (i.e., frontal plane, scapular plane)
- Range of motion (i.e., how high to lift)
- Set up position (i.e., standing, seated, tall kneeling, chest-supported, short kneeling, bent over)
- Load implement (i.e., dumbbell, kettlebell, cable, band, machine)
- Symmetry (i.e., 2-arm, 1-arm, offset load)
Hand Orientation in Lateral Raises Determines Muscle Emphasis and Rotator Cuff Health
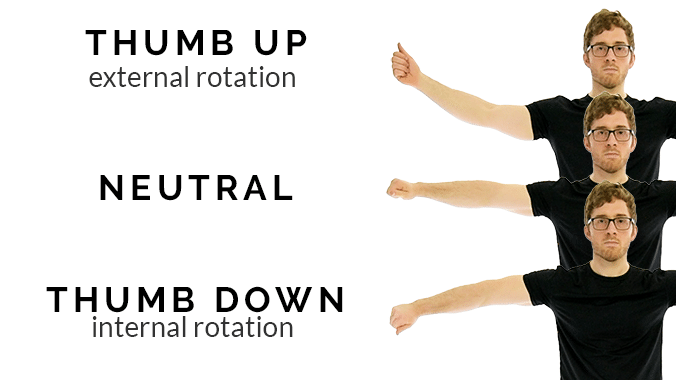
Hand orientation changes the degree of internal or external rotation of the shoulder.
Turning the thumb down internally rotates the shoulder, placing more emphasis on the middle deltoid. This is desirable, but not without consequences.
When the thumb points down while the arm raises up, the humerus in the shoulder joint rises up, pushing the rotator cuff muscles into the acromion process we described earlier. This is called a shoulder impingement and can contribute to rotator cuff tears.
In general, you shouldn’t point the thumb down during lateral raises. The risk is not worth the reward.
Plane of Movement in Lateral Raises Determines Muscle Emphasis and Rotator Cuff Health
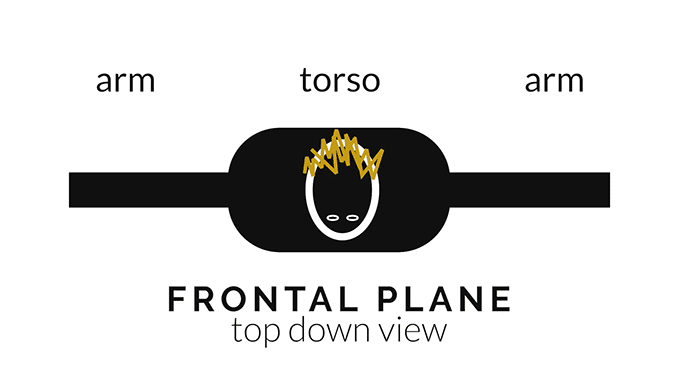
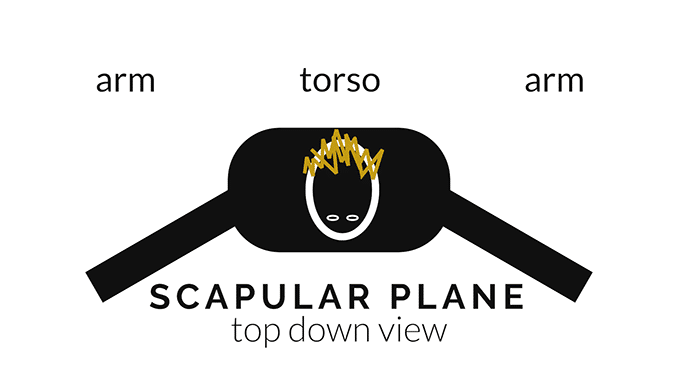
Lateral raises are traditionally done in the frontal plane, meaning both arms stay inline with the torso.
The frontal plane, however, is not a neutral position for the shoulder.
The scapular plane keeps the arm inline with the shoulder blade and provides the most freedom of movement in the joint. This reduces wear and tear on the rotator cuff, but shifts muscle emphasis from the middle deltoid to the front deltoid.
The Deltoid is Not Involved in the First 15 Degrees of Movement
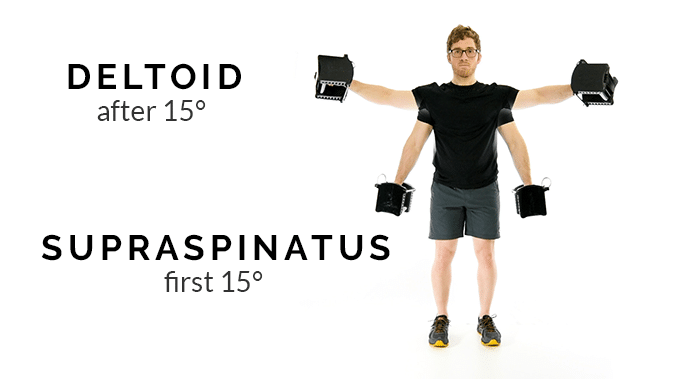
Initiating the movement, bringing the weights from the sides of the body to 15 degrees away from the body, is done by the supraspinatus rotator cuff muscle.
Developing large shoulders does not require this 15 degrees of movement.
Shoulder Abduction Past 90 Degrees Emphasizes the Deltoid, But Limits Space for the Rotator Cuff
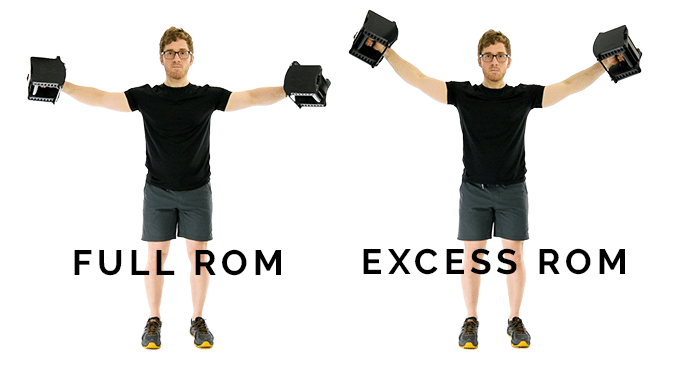
If lateral raises are performed to roughly 105 degrees of abduction, mechanical load placed on the deltoid increases.
This extra movement, however, also pushes the rotator cuff toward the acromion and can create an impingement.
Load Implement Changes Torque About the Shoulder
The weights we train with create a torque around the joint we’re training.
When doing lateral raises with dumbbells, the lift gets really easy when the weight is close to the body. This is because the moment arm of the weight, and therefore the torque required to oppose it, is small.
There are three ways we can challenge the muscle through a longer range of motion:
- Use a machine designed to train this particular muscle group
- Change how the external force is applied (using a cable or band instead of a weight and gravity)
- Change the orientation of the body during the lift
Unilateral Movements are Healthier for the Shoulders
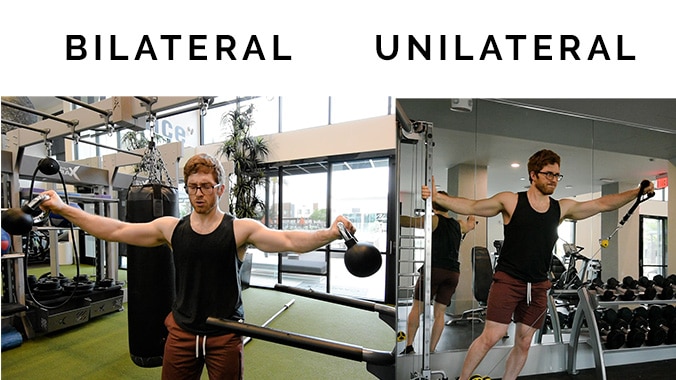
Most lifts that promote muscle gain are done bilaterally where we move both sides at the same time.
Unilateral movements can also be used to demolish the muscles, but they offer the added benefit of shoulder freedom. Slight twisting, turning, and bending in the torso promote proper shoulder and shoulder blade alignment.
The Best Lateral Raise Variations
We’ve outlined that there are seemingly infinite ways to switch up the lateral raise, but some are better than others.
Instead of showing you every possible variation, here are the three best ones.
Best Free Weight Option: Chest-Supported 1-Arm Lateral Raise
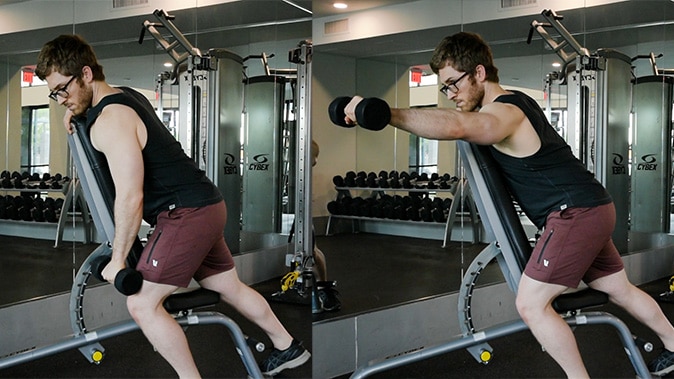
We will combine our variations to compose the most useful exercise for building the middle deltoids with only free weights.
- Set an incline bench to 80 degrees
- Grab a light dumbbell and place the chest on the bench with the head just above the bench
- Keeping the arm straight and palm facing down, raise the dumbbell through the scapular plane, roughly 30 degrees in front of the torso
- Pause briefly once the arm hits parallel with the ground
- Lower the weight back down under control
The incline bench supports the body, replicating the stability you’d get from a machine.
The incline bench also allows a slight forward torso lean which intensifies the load placed on the deltoid through a longer range of motion.
The deltoid has poor leverage at the top of a lateral raise. This is because the muscle fibers are too short to generate appreciable force. This lean-away cable variation puts more load on the deltoid when it’s strongest, that is, at the bottom of the movement, and removes challenge when it’s weakest at the top.
Best Cable Option: Side Lean Low Cable 1-Arm Lateral Raise
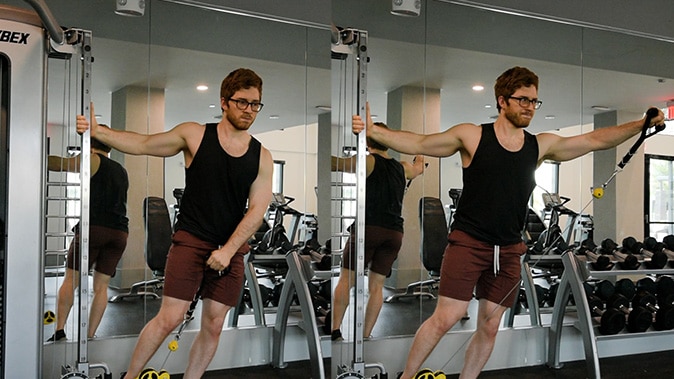
A cable machine is better at loading the lower half of the lateral raise.
- Set the cable as low as it will go and select a light weight
- Grab the cable with the working arm, then grab cable machine with the free arm and lean the body 15 degrees away from the machine
- Keeping the arm straight and palm facing down, raise the dumbbell through the scapular plane, roughly 30 degrees in front of the torso
- Pause briefly once the arm hits parallel with the ground
- Lower the weight back down under control
The lean away intensifies the contraction of the deltoid, but moving through the scapular plane helps the shoulder stay healthy.
Best Full Gym Option: Bent Elbow Lateral Raise Machine
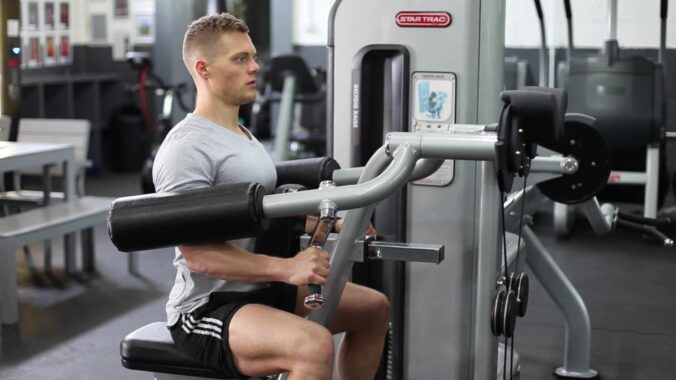
All machines will do fine here, but finding one that places the pad at the elbow reduces the forearm and upper arm involvement, better isolating the deltoid.
Now that we know the best variations, let’s talk about how people mess them up.
Common Mistakes When Performing Lateral Raises
It takes discipline to perform lateral raises correctly. It’s important to keep tension on the deltoid even when it gets tired. This maximizes the growth response while minimizing risk of injury.
Shrugging
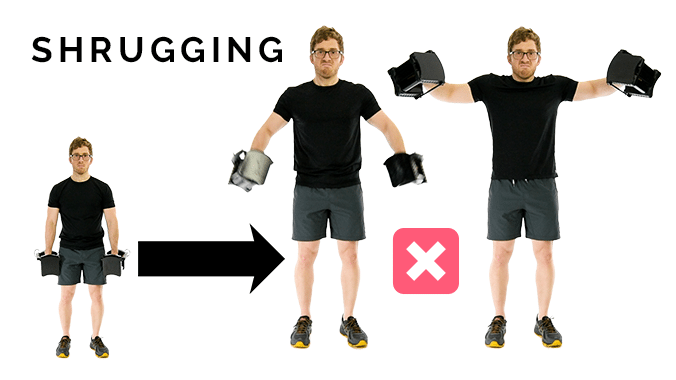
Shrugging during the lateral raise removes tension from the deltoid while promoting neck stiffness. It is best to be avoided.
Shrugging will commonly occur is one of two places: when starting the raise in an effort to build momentum, or when finishing the raise in an effort to feel a stronger contraction at the top.
Back Arching
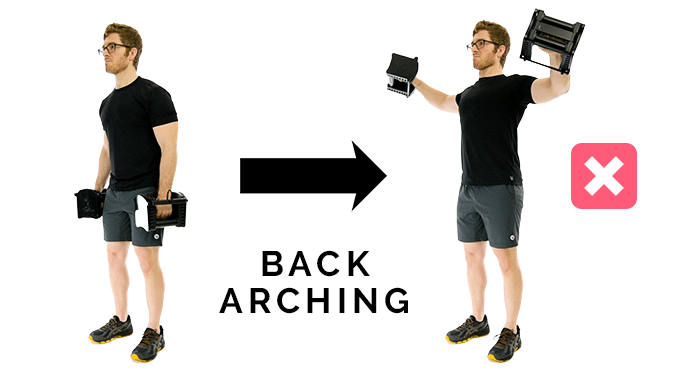
Back arching during the lateral raise shifts the tension from middle deltoid to front deltoid.
Arching the back also promotes back and neck stiffness while reinforcing bad movement patterns. It is best to be avoided.
Too Much Momentum or Too Heavy of Weight
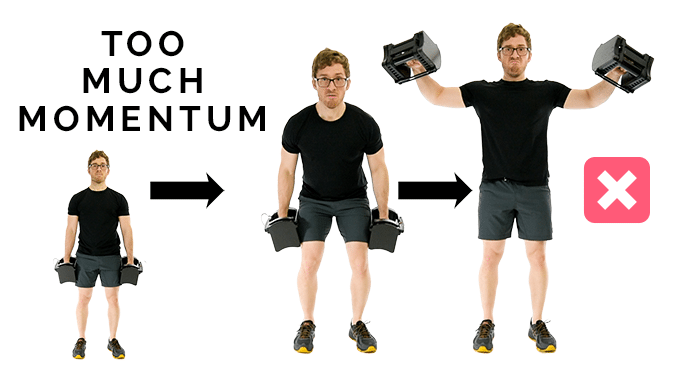
Rushing through the lateral raise means less tension is placed on the muscle. Aim to pause briefly at the top of each rep to kill momentum.
Momentum and bent elbows are often used to help lift weights that are too heavy. If you can’t do the lift without momentum or if you need to keep the elbow bent, lower the weight.
It’s worth noting that the lateral raise is not an exercise where we routinely use heavier weights. This for two reasons:
- most of the torque comes from the moment arm, so slight changes in load have a large impact, and
- this deltoid isolation exercise is generally performed near the end of a workout when the muscles are already fatigued
Next, we’ll talk about how to change your technique at the end of a set to force out a few more reps and really challenge the muscle.
How to Use Technique for Forced Reps
When the deltoid is fatigued to nearly its limit, slow and perfect technique might be unattainable.
The muscle, however, might not be fully fatigued. Forcing out fractions of a rep can provide an extra growth stimulus.
Momentum is Acceptable at the End of the Set
To force extra reps and therefore more fatigue into the deltoid, you can start the movement with the legs to assist the raising of the weights.
Once the weight reaches the top, attempt to stop it briefly and lower it slowly. This uses momentum to assist the difficult part of the rep (the raising), while forcing pure technique on the easier part (the lowering).
Bending the Elbows
You can also instantly lower the torque required to lift the weights by bending the elbows.
This can change where the emphasis on the muscle is placed, so be sure to target the middle deltoid.
